When you’re pushing your motorcycle hard—whether on the street carving twisties or at a track day—you’ll quickly learn that the engine, tyres and brakes aren’t the only factors that decide how good your ride feels. The suspension plays an absolutely critical role, and in particular the valving of your suspension (the internals that control damping) is one of the most under-used performance levers in our builds.
In this post you’ll learn how to think about suspension valving: what it is, why it matters, what common mistakes cost you, and how you can approach dialing your bike in for both street and track use. We’ll cover front forks and rear shock, compression & rebound damping, spring rate, preload + sag, and real-world tuning tips. With these tools you’ll have more confidence in corners, better mid-turn stability, and less unwanted movement when the pace picks up.
1. What is Suspension Valving?
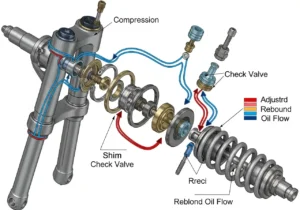
Suspension “valving” refers to the internal components in your forks or shock that dictate how oil flows past shim stacks and orifices during compression and rebound strokes. In plain language, it controls how quickly the suspension moves under load and recovers afterwards.
- Compression damping = controls how fast the suspension compresses under load (e.g., braking, hitting a bump).
- Rebound damping = controls how fast the suspension extends back out after compression.
- The valving stack (shims/orifices) sets the “throttle” for oil flow; smaller openings = slower movement (stiffer feel), larger openings = faster movement (softer feel).
- Valving must work in harmony with spring rate (which resists movement) and preload/sag (which sets baseline ride height) — you can’t improve everything simply by tweaking valving alone.
You’ll see articles teaching you to set sag, preload, and spring rate first, and only then move into valving. That order matters for both street and track performance. The Motor Guy+1
2. Why Valving Matters – Street vs. Track
Street riding and track riding place very different demands on the suspension. A setup that feels “OK” on street might be hopeless when cornering hard at speed or under braking on track.
- On the street: You want comfort, confidence over rough patches, predictable behaviour in traffic or on uneven surfaces. Too stiff a valving and you’ll feel every bump; too soft and you’ll feel sloppy in corners.
- On the track: You want stability under heavy braking, sharp turn-in, consistent behaviour through chicanes or high-G corners, and minimal energy loss through suspension movement. You also may want the suspension to stay active (absorb mid-corner bumps) but not wander or wallow.
If your valving is too soft on track you’ll bottom out, feel vague in the turn, get poor tyre contact. If too stiff on the street you’ll fatigue quickly and miss cues in the chassis. Articles like “Master Motorcycle Suspension Setup for Track Success” highlight this balance. The Motor Guy
3. Start With The Fundamentals
Before you start messing with the valving clickers, start here:
3.1 Check Components & Condition
Make sure your forks and shock are in good condition: no leaking seals, no excessive play in linkages, tyres and pressures correct, bearings and pivot points clean and greased. A great valving stack can’t fix a sloppy mount or worn-out part.
3.2 Set Correct Spring Rate & Preload / Sag
- Spring rate must match your weight (rider + gear + bike) and your riding style.
- Set static sag (bike on stand vs bike on wheels) and race/ride sag (rider on bike in riding gear). Getting sag right ensures you’re starting from a good baseline. dalsoggiorace.com
- Preload adjusts sag but doesn’t change how “soft” or “firm” the damping feels — that’s valving’s job.
3.3 Baseline Valving/Settings
Before digging deep, set your compression and rebound adjusters (if present) to a “middle” or “stock” setting as provided by manufacturer or a trusted tuner. Then ride and note how the bike behaves under heavy braking, mid-corner, exit, and under bumps. This will be your baseline for changes.
4. Valving Adjustments – What To Change & Why
Here we dig into how you can tweak valving for different scenarios.
4.1 Compression Damping Adjustment

- If the front dives too quickly under braking or the rear squats excessively, you’re likely soft in compression damping. Increase compression damping (firmer) to slow that movement.
- If you feel harsh hits over bumps, chatter when entering a turn, or the bike feels “locked”, your compression might be too high (too stiff). Reduce compression damping to allow better absorption.
- For track: often you need firmer compression than on the street, because you’re loading the forks/shock harder, hitting kerbs, and generating high-G.
- For street with imperfect surfaces: slightly softer (within reason) can improve comfort without sacrificing stability.
4.2 Rebound Damping Adjustment
- Rebound controls how fast the suspension returns after compression. Too fast = suspension kicks back, unsettling the bike. Too slow = suspension “packs” (doesn’t extend in time), leading to loss of traction or weird chassis behaviour.
- If you exit a corner and feel the bike “bounce” or unsettled rear, increase rebound damping (slower return).
- If you feel the rear ends stays stuck and you lose contact, reduce rebound damping (faster return) so the tyre stays planted.
- Many modern setups allow both “low-speed” and “high-speed” adjusters (especially for off-road; but also some track/road bikes). The low-speed part governs slower movements (roll, braking) and high-speed deals with hits, kerbs. Keefer, Inc. Tested
4.3 Valving vs Spring Rate Realities
Even the best valving stack can’t make a too-soft spring behave like a stiff spring. If your spring rate is wrong for your weight/purpose, you’ll run out of usable travel and/or get bottoming. Good valving works best when springs and preload are correct. dalsoggiorace.com

5. Adjusting For Track or Street Use
5.1 Street-Focused Setup
- Use a moderate spring rate and preload so you have some comfort margin over bumps.
- Use slightly softer compression damping than track setup so you stay comfortable.
- Use a slightly faster rebound setting so the suspension recovers quickly over bumps.
- Avoid going too soft, as this can reduce cornering confidence and increase dive under braking.
- Monitor sag under normal riding conditions, adjust preload if you’re heavily loaded with luggage/passenger.
5.2 Track-Focused Setup
- Increase spring rate & preload slightly (or fit dedicated track springs) so the suspension has less sag under high loads (braking, cornering).
- Increase compression damping to resist dive under hard braking and maintain chassis stability in turns.
- Slow down rebound damping as needed so the suspension returns steadily without “kicking” or “bouncing” at transition points (e.g., kerb hits).
- Use test sessions: lap, check how the bike behaves under braking, mid-corner and exits. Make small incremental changes only. As one source puts it: “Small increments; a few clicks can make a significant difference.” The Motor Guy+1
- Understand the track surface: if smooth and fast, you may lean even stiffer; if bumpy or undulating, allow more compliance—still controlled.
6. Common Mistakes & How To Avoid Them
Here are mistakes many riders/builders make when valving suspension:
- Skipping spring/preload check: Adjusting valving without a correct spring rate is like installing performance tyres on rims out of alignment — you’re only partly solving the problem.
- Ignoring sag: If sag is off, your ride height and geometry are wrong, and valving changes won’t fully correct handling quirks.
- Over-tweaking too soon: Making lots of changes at once and not logging “before” vs “after” means you’ll lose track of what worked. Always establish a baseline and change one thing at a time.
- Using street settings on track (or vice-versa): A valving setup that works for commuting might be unsafe or slow at a track session.
- Ignoring tyre pressure, chassis adjustments, rider weight changes: Suspension is part of a system. Tyres, bike geometry, rider input all affect how your valving will feel. For example, softer tyres may mask bad valving or accentuate dive.
- Not measuring & recording: Use a notebook or phone app to record your settings, ride conditions, lap times/feel. Without logging, you’ll revert to guesswork.
7. Step-by-Step Tuning Process
Here’s a suggested workflow for tuning your suspension valving:
- Pre-ride checks
- Check fork seals, shock condition, linkage bearings, tyre condition/pressure, chain slack.
- Set tyre pressures appropriate for street or track.
- Ensure you have a clean slate before making valving changes.
- Set springs & sag
- Fit springs rated for your weight/travel use.
- Set static sag and ride sag (front and rear). If sag is too much/too little, adjust preload.
- Ride a test session at moderate pace and note behaviour.
- Baseline valving ride
- Use stock or manufacturer recommend compression & rebound settings (clickers at mid-position).
- Ride normal route (street) or first track session. Note feel: dive under braking? wallow in corners? bottoming? harsh bumps?
- Compression adjustment
- If excessive dive or bottoming, increase compression damping. Make small increments (e.g., 1-2 clicks).
- If harsh bumps/kerbs are punishing, reduce compression.
- Test again and log changes and feel differences.
- Rebound adjustment
- If the suspension is slow to extend (pack) or rear stays loaded/low, reduce rebound damping (faster return).
- If there’s a rebound “kick” or bike is unsettled after compression, increase rebound damping (slower return).
- Again, change one setting at a time, ride, note, repeat.
- Fine-tune for surface / usage
- For track: after initial tuning ride several laps, note transitions, kerbs, braking stability. Adjust as needed.
- For street: ride on known road, note how the front hits bumps, how the rear tracks, corners feel.
- Adjust for specific problem areas (e.g., “in back straight I felt the rear pogo-ed”, “under heavy trail-brake the front dived too much”).
- Review & record
- Write down final clicker settings, spring rates, preload values, sag measurements, tyre pressures, ride conditions.
- Keep this record for future reference (especially useful for changing tyres, load, or track vs street).

8. Practical Tips & Real-World Considerations
- If you alternate between street and occasional track, consider running a compromise setup (slightly firmer than street stock) and then just raise preload or make minor damping tweaks on the day you go to track.
- If you carry a passenger or luggage often, expect your sag and valving to change: you’ll need firmer spring or more preload for good ride.
- Tyre condition and pressure change the game: a worn tyre gives less grip, which can amplify suspension deficiencies.
- Riding style matters: If you ride aggressively (hard braking, heavy corner entry), you’ll benefit more from firmer compression and slower rebound. If you ride relaxed or on rough roads, more compliance may suit you.
- Don’t ignore the feel: Your gut reaction matters. If the bike feels “on rails” or “predictable”, you’re doing well. If it feels vague, nervous, or exhausting, revisit your valving.
- Consider professional suspension service or custom valving (shim stacks) if your bike’s usage is heavy track or you want top performance. According to one source, good valving is important, but springs + oil level + sag are just as critical for return on your upgrade. dalsoggiorace.com
10. Bring It All Together & Daily Use Checklist
Before your next ride (street or track), run through this quick checklist:
- Spring rate matches rider + gear + bike.
- Static sag OK, ride sag measured + logged.
- Tyre pressures correct for condition.
- Forks and shock in good condition (no leaks, bearings tight).
- Baseline valving/check ride: record feel.
- Make one change (compression or rebound), ride again, note difference.
- Repeat until your bike feels confident under braking, through turns, over bumps.
- Log all settings. Try to keep track of conditions (track surface, weather, tyre temperature).
- For track day: consider raising preload slightly, stiffening compression, slowing rebound.
- For street ride: consider slightly softer compression, quicker rebound, focus on comfort + predictability.
Conclusion
Valving your suspension properly is one of the most meaningful upgrades you can give your ride — whether you’re carving twisty roads or chasing lap times. It’s not glamorous like a big engine mod, but it’s felt every time you change direction, brake hard, or hit a bump. By following the process above — check fundamentals, baseline settings, incremental changes, logging results — you’ll build a setup that works for you and your bike.
And remember: the goal isn’t “max stiffness” or “max comfort” — it’s balance. The suspension should feel like an extension of your control, not something you’re fighting. Get there and you’ll ride faster, more confidently, and with less fatigue.